Why lead remains the roofing industry’s most trusted material
Lead has been used in roofing construction for over two thousand years, and its continued dominance in the UK residential roofing market is a reflection of its extraordinary combination of properties rather than mere tradition. It is malleable enough to be dressed to complex shapes by hand, dense enough to resist wind uplift without mechanical fixing, chemically stable enough to last over 100 years in service, and self-healing in the sense that minor surface damage does not compromise its waterproofing performance.
In West London’s Victorian, Edwardian, and 1930s housing stock — which makes up a significant proportion of the properties in Hayes, Ealing, Hillingdon, and Hounslow — original lead flashings remain in place on many homes. Some of this leadwork is over 80 years old and still performing. But even lead eventually needs attention: the mortar pointing that holds lead step and cover flashings against masonry deteriorates, lead can crack at stress points from repeated thermal cycling, and the Code (thickness) of lead installed in a previous era may be thinner than current best practice recommends.
Understanding how lead is used, where it commonly fails, and what proper repair looks like helps West London homeowners make better decisions when a leak develops — and avoid the trap of a quick patch that masks a more fundamental problem.
Where is lead used on a typical West London roof?
Lead appears at every junction between the roof covering and a vertical surface or change of direction. On a typical semi-detached or terraced property in West London, the following lead elements are present:
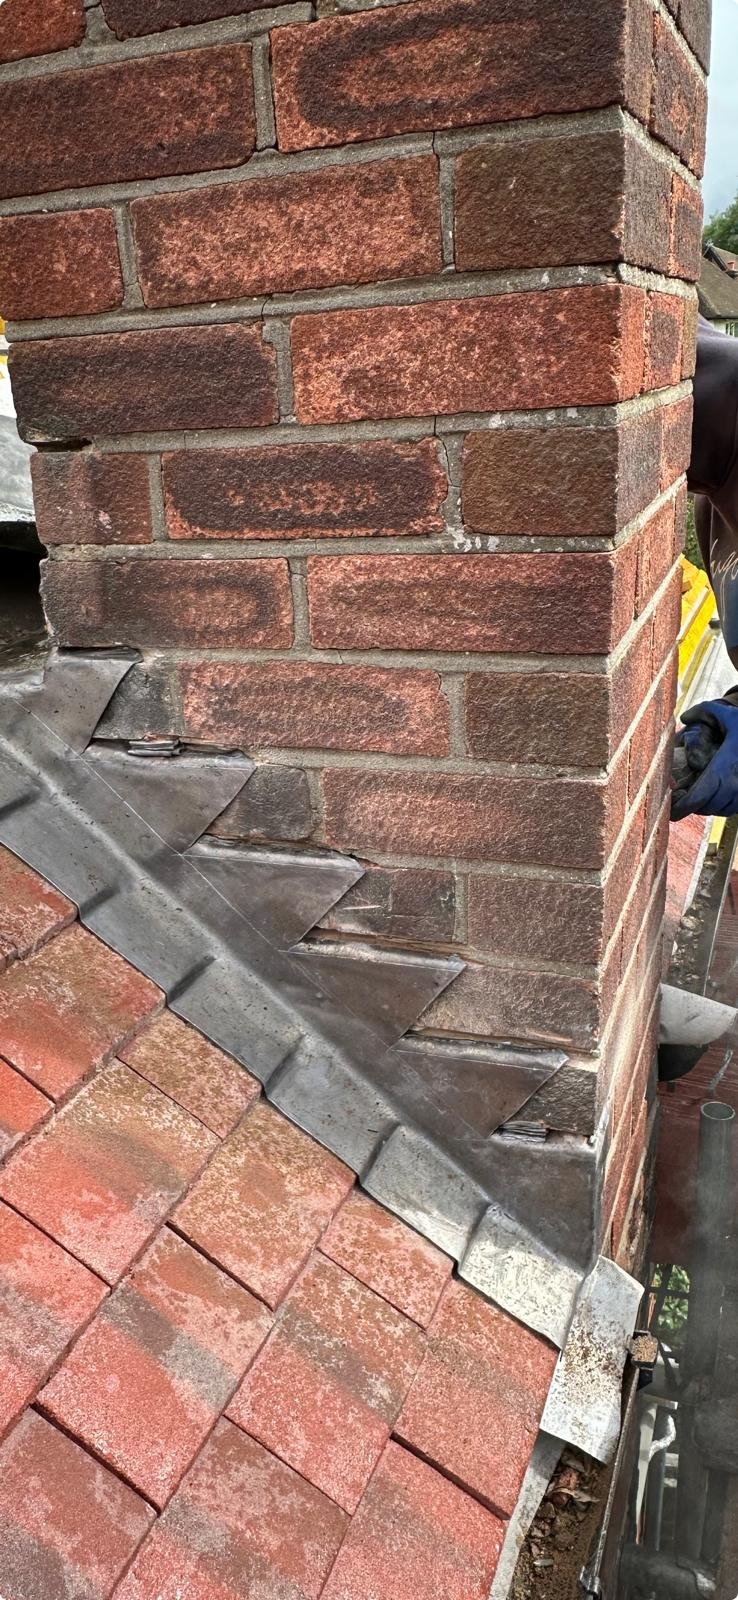
Chimney flashings: the complex of lead soakers, step flashings, back gutter, and front apron that waterproofs the junction between a chimney stack and the roof slope is the most demanding leadwork installation on most houses. Four separate lead elements are required for a standard chimney, each needing to overlap correctly and be fixed and pointed into the masonry.
Valley gutters: on hipped roofs and at intersections between two roof slopes, a lead valley channel collects and directs water to the gutters. Valley lead is subjected to constant water flow and should be installed in sections with allowance for thermal expansion.
Abutment flashings: where a roof meets a boundary wall, extension wall, or dormer cheek, a cover flashing laps over a soaker or upstand to seal the junction. This is one of the most frequently failed lead details on West London properties.
Parapet gutters and box gutters: on properties with parapets — particularly Victorian terraces — a lead-lined gutter behind the parapet wall collects water from the main roof. These are large, complex lead installations and their failure can cause severe structural damage if water overflows behind the parapet.
Roof penetrations: lead soakers around vent pipes, soil stacks, and chimney pots seal the junction between circular penetrations and the surrounding roof tiles or slates.
The most common causes of lead flashing failure
Lead flashing failure falls into three broad categories: mortar failure, lead fatigue, and incorrect original installation.
Mortar failure is the most common cause of lead flashing leaks. The mortar pointing that secures cover flashings into a chase cut in the masonry, or that beds ridge tiles and coping stones adjacent to lead, cracks over time due to thermal movement and the carbonation of lime mortars. When the pointing fails, the lead lifts away from the masonry surface and water runs directly down behind it. The lead itself may be perfectly sound — the problem is that it is no longer held in contact with the wall.
Lead fatigue occurs when lead is installed in over-long sections without proper provision for thermal expansion, or in a position where it is repeatedly flexed by structural movement or wind. Lead expands and contracts significantly with temperature change, and a section that cannot expand freely will crack at stress points — typically at bends and welts — over time.
Incorrect installation covers a wide range of issues: lead that is too thin (too low a Code number) for its application, flashings installed without soakers beneath (meaning water can track behind the lead even when the flashing itself is intact), or lead fixed with incompatible metals that cause galvanic corrosion.
Chimney lead flashing repair — what is actually involved
Chimney flashing repair is one of the most frequently required roofing jobs in West London, and also one of the most commonly misquoted and misexecuted. A leak at the chimney that is caused by failed mortar pointing is a relatively straightforward repair: remove the old pointing from the lead chase, re-dress the lead if it has lifted, re-point with a flexible lead or polyurethane-based sealant and a mortar topping.
A chimney flashing leak caused by cracked or incorrectly installed lead is a more significant repair. It may require stripping all four elements of the chimney flashing — front apron, two sides of step flashings, and back gutter — and installing new lead to current best practice standards. This is particularly common on older properties where the original lead was installed in the 1940s or 1950s at a specification (Code 3) that is now considered too thin for exposed chimney applications.
A common mistake is applying bituminous flashing tape — the black rubberised product sold in DIY stores — over a failed chimney flashing. This can provide a temporary seal but does not address the underlying failure, tends to crack at edges within two to three years, and makes subsequent proper repair more difficult as the tape adheres to both the lead and masonry and must be removed.
If your property has a chimney that has been unused for years but still has a chimney stack projecting through the roof, the chimney still requires fully maintained and watertight flashings even if no fire is lit. An unused chimney stack subjected to decades of freeze-thaw cycling without maintenance is one of the most common sources of serious structural damp in West London period properties.
Lead valleys: repair, relining, and when to replace
Lead valleys on West London hipped roofs and complex roof geometries are high-flow water channels, and their condition directly affects how well the drainage system manages heavy rainfall. Valley lead should be inspected every five to ten years as part of routine roof maintenance.
Minor cracking at welt points — the folds that join valley sections — can sometimes be addressed with targeted lead repair using new lead patches and lead-burning (welding). However, where the valley lead has corroded, been installed in over-long sections that have developed tension cracks, or is showing widespread crazing of the surface, relining is more appropriate.
Relining a valley involves removing the existing lead, inspecting and replacing any rotten valley boarding beneath, and installing new lead to current Lead Sheet Association (LSA) guidelines — which specify Code 4 minimum for valleys, with laps, clips, and expansion joints correctly positioned. Properly installed valley lead has a service life of 60 to 100 years.
Heritage leadwork — listed buildings and conservation areas in West London
West London contains numerous conservation areas — in the London Boroughs of Ealing, Richmond, Hounslow, and Hillingdon — where strict controls apply to the materials and methods used in any roofing work. For listed buildings and buildings in conservation areas, replacing lead with modern alternative materials (such as GRP or lead-look aluminium) is generally not permitted. Like-for-like replacement with traditional lead to LSA standards is required, and the work should be carried out by a contractor with demonstrated experience in heritage leadwork.
For conservation area properties in West London considering roof repairs or leadwork renewal, always check with the relevant local planning authority before proceeding. Carrying out unauthorised alterations to a heritage property — even internal, and even when the change is not visible from the highway — can result in enforcement action requiring reinstatement at the owner’s cost.
Frequently asked questions — leadwork and lead flashing West London
Q: How much does chimney lead flashing repair cost in West London?
Minor re-pointing of existing chimney flashings typically costs £150–£350. A full chimney flashing strip and replacement with new lead typically costs £450–£950 depending on chimney size and access requirements. Emergency call-out to make a leaking chimney watertight starts at £250–£400.
Q: How long does lead flashing last?
Properly installed Code 4 or Code 5 lead flashing, correctly pointed and maintained, can last 80 to 100 years. The mortar pointing that secures the lead requires renewal every 15–25 years depending on exposure and the type of mortar used.
Q: Can I use lead repair sealant as a DIY fix?
Sealants and flashing tape can provide a temporary patch on an accessible flashing, but they are not a permanent solution. They deteriorate in UV, do not bond permanently to masonry, and frequently cause water to track to a new failure point at the sealant edge. Professional repair with properly specified lead is always the correct long-term solution.
Q: Why does my chimney leak only in certain wind directions?
Wind-driven rain can penetrate flashing details that are perfectly watertight under vertical rain. If a chimney leaks only in specific weather conditions, it typically indicates a gap or insufficiently lapped flashing on the windward side — the side the wind is hitting directly. This is a common presentation for step flashing that has not been properly integrated with soakers beneath.